Step by step to easily install nut rivets and obtain a great result.
Often, we get asked: “What can I use to mount something on a thin substrate such as sheet metal, fibreglass, or plastic?” One customer’s aim was to mount a bike rack in the back of a van. After he scratched his head, he called us.
We suggested a nut insert would do the job. His response – a what? After trying it he found a nut insert was a great option. It gave a professional-looking and sturdy threaded mounting point.
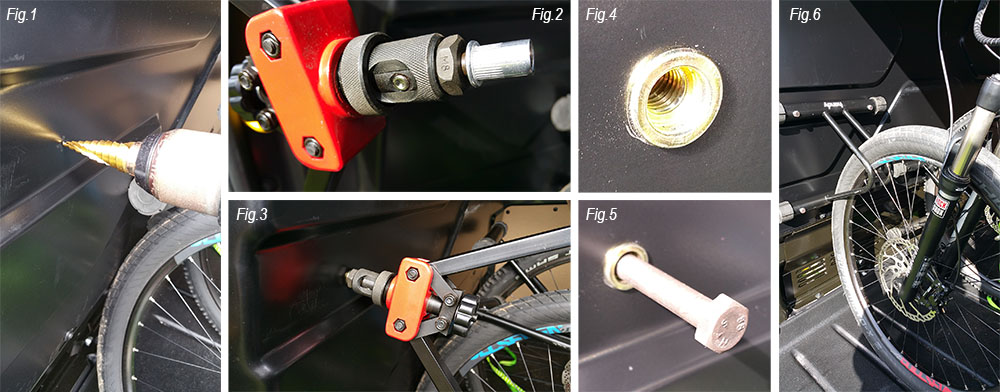
Following simple steps, a great result can be achieved. Firstly, mark where the rack will go on the metal panel. He selected M8 insert with an outside diameter of 10.8mm, using a step drill a 11mm hole was drilled – remember it is very important to drill the correct size hole so the nut insert just fits and is not loose (Fig.1 and 2).
Using a nut riveting gun and fitting the M8 stem, fully open the rivet gun arms and screw the insert on the stem until it protrudes a little. Using the gun, push the insert into the hole firmly and squeeze arms together until they stop. Turn the knob on the back of the gun anti-clockwise to remove the stem from the insert (Fig.3 and 4).
After doing this for all mounting points, he mounted his rack (Fig.5 and 6).
TIPS AND TRICKS
- If using on thicker substrate adjust the sheath on the gun to only crush the rivet enough to grip and not damage the substrate.
- Ensure grip range on insert is correct for the thickness of the substrate you are working with.
- Inserts come in different materials and sizes; alloy, steel, stainless with long and short grip ranges and offer a great solution for securing or mounting in many applications.